How to publish your website on GitHub Pages
Last Updated: Tuesday, July 10, 2018
Activate GitHub Pages
If you want to build a website, sooner or later you need a way to test it and verify that users will be presented with what you intended to. In order to do so, you need a webserver.
Apache, NGINX, Node.js, Tomcat are some examples of web servers you can choose from. These programs are powerful and complex to setup. Use one of them could be a choice if you want to build and control your own environment, but this add an extra layer of unneeded complexity if what you want is just to start learning some plain HTML.
Nowadays there are other choices other than set up your own development environment. For example, you can use resources on Cloud. Amazon AWS, IBM Softlayer, Microsoft Azure are all possible choices. However, they replace one complexity layer with another one: you need to understand how they work and setup the environment (aside of providing your credit card number).
Luckily, there is a choice we can leverage to get quickly up and running with a basic static webserver: GitHub Pages. GitHub Pages (GHP) is a static webserver based on Jekyll engine, integrated with GitHub repositories. It is able to serve static HTML pages as well as transform Markdown documents into HTML pages. It can works as a blogging platform and is integrated with your GitHub repositories to provide online documentation about your project.
Overall, it is an easy and inexpensive way to start your journey into web programming. Let’s see how we can set it up.
GitHub Pages can serve two types of sites: User or organization site or Project site. At this stage, you can think of a User or organization site as a main container for all your Project site: all your Project sites will be served as children of your User site.
We are not interested now in digging into the working details of GitHub Pages, so we will start with focusing on creating your User site in order to use it to serve static web pages.
By now you should have created your GitHub profile. For example, my public profile is available at https://github.com/aizzi.
In order to create your GitHub Pages user site, you must create a new repository called <username>.github.com. Pay attention, that it must exactly match your username. If you are in doubt, you can find your username on the top-left side of your profile page, under your picture.

So, go on and create it.
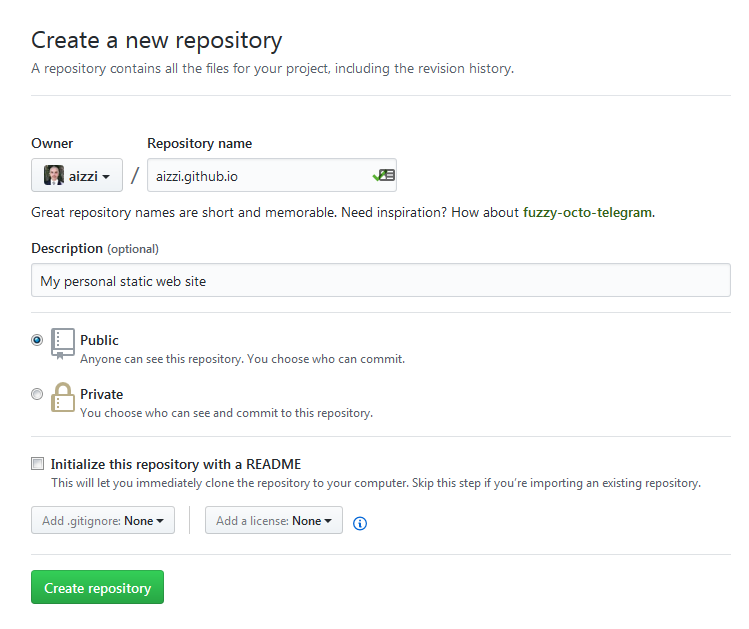
Once it is created, create the index page of your site index.html and copy the following text in it (changing my name with your one):
<!DOCTYPE html>
<html>

  <head>
    <title>Antonello Izzi's Web Site</title>
  </head>

  <body>
    <h1>Antonello Izzi's Web Site</h1>
    <p>My personal static web site</p>
  </body>

</html>
That’s it: your personal website is ready for your at the address https://<username>.github.io. Go on and check it!
Now, clone the repository on your computer and you are ready to go.
The nice part of this setup is that publishing your site is as easy as pushing your commits to the master branch of <username>.github.io repository. The GitHub Jekyll backend will do the rest, processing your site and publishing it.
Note: since your commit has to be processed by the Jekyll engine, it could take a while before you see your changes published. Be patient and allow for it to work. Later on in this course we will setup a local Jekyll environment to test your changes before to push them, but for now what we have is more than enough.
A really valuable resource about how to work with Jekyll on GitHub Pages can be found here.
Jekyll will run through your repository, ingest all your files, transform them as needed and serve them out as a static website which can be served on the internet.
The nice part of this is that, unlike Medium, or Linkedin or Blogger your posts and articles are still yours. You can control what goes up, and take it down as you like. If GitHub should close tomorrow, you will still have your website right there on your hard disk, ready to be publish somewhere else.
Jekyll is blogging aware, meaning that if you maintain a specific naming convention for your files, it will be easy to publish your articles and serve them as a blog.
As a bonus, it will be extremely easy to link your Git project’s documentation to your site, making it the very centre of your internet presence. Later on, you can still migrate it to a webserver able to provide dynamic content if you need. But until then, why bother with maintaining such an environment?
This tutorial is mostly the documentation of how this very site was developed from scratch. This means that I will update it while I progress in designing my site.
I will proceed by steps, building one feature after the other, solving problems as they present themselves and documenting all the steps and the choices I make. I have some HTML and CSS knowledge, as well as some programming skills, but it has been a while since I used them and lot of things did change over time. This means that sometimes I will come back to change something because I find a better way to do it, or because I simply changed my mind. All those changes will be documented here.
Configuring the website
Although Jekyll will scan through all your repository, some directories and files have a special meaning to it. Jekyll’s directory structure is described here. I will not repeat what’s already described in the documentation, but summarizing it in a Jekyll enabled site you will find the following:
_config.yml: a configuration file for Jekyll features, accurately described here_data: it will contains all data used throughout your site. Any files stored in this directory can be accessed via asite.datavariable._drafts: this directory will contain all the drafts of your articles_includes: this directory contains files that can be included in other files in your site using the liquid tag{% include file.ext %}_layouts: this directory contains the template used to render your web pages. Providing the right YAML FrontMatter in a file, you can insert the content of the file in the choosen template by using the tag{{ content }}_posts: this directory contains your blog articles, using the naming conventionyyyy-mm-dd-title-of-the-article.md_sass: this directory contains the sass files used throughout your websiteindex.html: the index page of your site (we already created it).
The other directories are not directly used by us and are only important if you are going to build your own Jekyll engine. Since we are not going to do it yet, we’ll skip them. So, now go on and create the files and directories in your name.github.io repository as requested.
Now, let’s open the newly created _config.yml file and make some general configuration.
Note: these are the configuration I made to this website. They are reported here for documentation. You can make your own. Read the documentation and decide what you want to do with your site!
timezone: Europe/Prague
show_drafts: FALSE
future: FALSE
Site Layout
At this point, we have a very simple, old style static web site. If you know CSS and HTML, you can start working on the front-end, customizing the layout as you like. But what if you don’t know CSS and/or don’t want to invest time in working on the site layout? Maybe you, like me, are more interested in using the site to store your notes, projects, posts and tutorials.
Luckily for you, GitHub Pages provides you with a series of Jekyll themes you can choose from in order to help you. Let’s see how you can enable one of these themes for your site.
First of all, navigate to your <username>.github.io repository. Open the Settings and scroll down to the GitHub Pages section. There, you can find the Theme Chooser option. Do you see that nice button Chose a theme? Well, go on and click on it!
You will be presented with a list of themes to choose from. Choose the one that suits you most and click on the Select theme button when done. For this site, I’ve chosen the Architect Theme, but you can select whatever you like.
Now, let’s modify our site to use the theme.
First of all customize the _config.yml file to enable the new theme by adding the following line:
theme: jekyll-theme-architect
Read the documentation of the theme you choose in order to understand what to add for your one.
Then, modify the index.html file to use the layout:
---
layout: default
---
The snippet above is called a YAML FrontMatterand it is used to specify configurations and variables. By specifying the layout, Jekyll will replace the {{ content }} tag in the _layouts\default.html file provided by the theme with the actual content of the file (which is empty, for now).
Commit and push your updates and refresh the page. If everything is fine, you should get an empty page with the new graphics.
Now, let’s do another step. We don’t want to specify the layout for every single page in our site, so let’s move it into the _config.yml file as a default choice. Add the following line at the end of your _config.yml file:
# Setting defaults configurations
defaults:
  -
    scope:
      path: "" # apply this default to all files in the project
    values:
      layout: "default"
Now:
- rename
index.htmltoindex.md - remove the FrontMatter in
index.md, since it was defined into the_config.yml - add some text to see the changes.
- Commit and push your updates to see if it works.
Finally, as the last step of this phase, let’s customize the Title and the description of the site. The chosen theme supports two general configuration variables for that: title and description. Let’s add those into the _config.yaml file to set the corresponding values in the page header.
title: "Tetriminos"
description: "Filling (my) life with pieces of knowledge"
Customize the Layout
At this point, you should have a working page you can reach at the url ‘
In order to have a website, you need to add contents, such as pages, and blog posts. Let’s start with pages, like this tutorial for example. In order to do so, you must decide upfront the directory structure of your website.
For example, I want to use the right column of the theme I choose as a navigation column, allowing visitors of my site to reach out for the different sections of the sites.
Unfortunately, the standard layout provided does not allow for this out-of-the-box, so I’ll have to modify it a little bit. This will require some knowledge of HTML and CSS.
Create a _layouts/default.html file in your site, and copy in it the content of the _layouts/default.html file of the chosen theme. Now, the local copy will be used by Jekyll instead on the standard one, and you can modify it to suit your needs.
Define a Collection
I decided that I’d like to have a specific type of content that I will call tutorials. Tutorials are one-page articles, containing a step-by-step guide about a specific issue. These files will be stored in a specific directory called _tutorials, and will be defined as a specific Collection.
Start by creating the _tutorials/index.md file. This will be the starting page when someone reaches the <username>.github.io/tutorials url.
Now we need to define the collection into the _config.yml file:
# collections
collections:
  tutorials:
    output: true
I want this page to be an index for all my tutorials. This means that I want to list here all the content of the collection. This can be done programmatically by editing the _tutorials/index.md and inserting the appropriate code.
For each tutorial, I want presented on this page the following information: a title, a short description, the date of last update. In order to do so, each tutorial will have the following frontmatter:
---
title: "the title of the tutorial"
description: "the description of its content"
last_update: "last update date"
---
The last_update variable will be used to sort the list of articles in reverse order, so that the last updated will be presented on top of page.
The code to generate the index is contained into index.md page, which is loaded when I it the tutorials page on the site.
---
---
# Tutorials

<!---
Sort the tutorials in reverse order by last_update variable, so that last updated will be on-top of the page
-->


<!--
Iterate through the list of tutorials, and build the index
-->


  <div>
    <h2>
      <a href="/tutorials/install_docker_on_wsl.html">How to setup a development environment in wsl with Docker and Git</a>
    </h2>
  </div>
  <blockquote>
    <div>
      In this tutorial I describe the steps needed to create a development environment in a WSL2 environment, installing Docker in it without the need of installing Docker Desktop
    </div>
    <div>
      <small>
        <i>Last updated: 2022-07-20</i>
      </small>
    </div>
  </blockquote>


  <div>
    <h2>
      <a href="/tutorials/nkpg.html">How to Use Keycloak behind Nginx to serve Prometheus and Grafana</a>
    </h2>
  </div>
  <blockquote>
    <div>
      End to end tutorial describing how to deploy Keycloak behind Nginx reverse proxy in order to authorize users to access Prometheus and Grafana servers
    </div>
    <div>
      <small>
        <i>Last updated: 2020-07-18</i>
      </small>
    </div>
  </blockquote>


  <div>
    <h2>
      <a href="/tutorials/k8s_tutorial.html">Kubernetes Basics Tutorial</a>
    </h2>
  </div>
  <blockquote>
    <div>
      Notes and thoughts about the official Kubernetes tutorial
    </div>
    <div>
      <small>
        <i>Last updated: 2020-06-25</i>
      </small>
    </div>
  </blockquote>


  <div>
    <h2>
      <a href="/tutorials/k8s_learning.html">Setting up a kubernetes learning environment</a>
    </h2>
  </div>
  <blockquote>
    <div>
      In this tutorial I describe how I configured my kubernetes learning environment.
    </div>
    <div>
      <small>
        <i>Last updated: 2020-05-11</i>
      </small>
    </div>
  </blockquote>


  <div>
    <h2>
      <a href="/tutorials/ml_laptop.html">How to setup a laptop for ML exploration</a>
    </h2>
  </div>
  <blockquote>
    <div>
      In this tutorial I describe how I configured a laptop for my learning of ML related topics.
    </div>
    <div>
      <small>
        <i>Last updated: 2020-02-02</i>
      </small>
    </div>
  </blockquote>


  <div>
    <h2>
      <a href="/tutorials/kivy_chat.html">How to create a basic chat interface with Kivy</a>
    </h2>
  </div>
  <blockquote>
    <div>
      In this tutorial I describe the steps needed to create a basic dektop chat interface in Python using the Kivy framework.
    </div>
    <div>
      <small>
        <i>Last updated: 2020-01-06</i>
      </small>
    </div>
  </blockquote>


  <div>
    <h2>
      <a href="/tutorials/docker_rsync.html">How to backup using rsync in a container</a>
    </h2>
  </div>
  <blockquote>
    <div>
      In this tutorial I describe the steps needed to create a container to run rsync and use it to backup a FreeNAS server on a local USB external disk. This tutorial assume you have the same level of expertise about container I have when I wrote it: **PRACTICALLY NOTHING**
    </div>
    <div>
      <small>
        <i>Last updated: 2019-11-03</i>
      </small>
    </div>
  </blockquote>


  <div>
    <h2>
      <a href="/tutorials/nltk-notes.html">Notes on learning NLTK</a>
    </h2>
  </div>
  <blockquote>
    <div>
      In this tutorial I collected a bunch of notes I used during the study of the book *Natural Language Processing with Python*
    </div>
    <div>
      <small>
        <i>Last updated: 2018-12-30</i>
      </small>
    </div>
  </blockquote>


  <div>
    <h2>
      <a href="/tutorials/pfsense_in_virtualbox.html">How to install pfSense in a VirtualBox VM on your laptop</a>
    </h2>
  </div>
  <blockquote>
    <div>
      Do you want to place a professional firewall in front of your laptop?
    </div>
    <div>
      <small>
        <i>Last updated: 2018-12-11</i>
      </small>
    </div>
  </blockquote>


  <div>
    <h2>
      <a href="/tutorials/ghp-setup.html">How to publish your website on GitHub Pages</a>
    </h2>
  </div>
  <blockquote>
    <div>
      In this tutorial I describe all the steps I performed in order to publish this very same site on GitHub Pages. It was a trial and error process, as usual, and I learned a lot about templating from it. I hope it will help you to set up your own website.
    </div>
    <div>
      <small>
        <i>Last updated: 2018-07-10</i>
      </small>
    </div>
  </blockquote>
If you want to work on an article, but do not want it published, you can do that by using published: false into the front-matter section.