How to setup a Kubernetes environment for learning purposes
Last Updated: Monday, May 11, 2020
So, you decided to give Kubernetes a go eh? You brave fool!
I made the same decision once, not exactly for pleasure but because I needed to. Here is how I set up my first k8s environment on a virtual machine.
1 - References
To completed this tutorial I consulted the following documentation:
- Setting a Kubernetes cluster on Ubuntu VirtualBox: The lost guide by David Carrascal
- Kubernetes Documentation
2 - Environment
My environment consist of a Lenovo T490, equipped with an Intel Core i7-8665U CPU and 40 GB of RAM.
The hypervisor used to run K8S is ‘Oracle VirtualBox 6.1’.
The host OS is Windows 10.
The guest OS for K8S is Ubuntu Server 18.04 LTS.
Putty will be use to SSH login into the VMs.
Note: You can choose to install any other OS versions, including a Desktop one. But since this is a learning environment, I think it is best to keep it as similar as possible to a production one (which include learning how to use the OS environment).
In this tutorial I assume you have the hypervisor installed and that you know how to create a VM in VirtualBox. I’ll report only details about configuration of such VMs.
3 - Create the base VM
The first step is to create a base VM from which we’ll later clone the K8S nodes. This basically means to create the VM and configure some features that will be useful later. I’ll call this first VM k8sBase. My base machine has the following characteristics:
- Memory size = 1024 MB
- Create a virtual hard disk now
- Hard Disk type : VDI
- Dynamically allocated
- Size 10GB
Now, start the newly created VM, load your ISO image and completed a basic configuration of the server. When presented with the option, Install OpenSSH server so that you will be able to remotely connect to this machine. Do not install any of the popular snaps: we are learning!
Once finished, restart your server and update/upgrade:
sudo apt-get update && sudo apt-get upgrade -y
3.1 - Install Docker
Instructions about how to install Docker for a Kubernetes environment are available at the official Kubernetes documentation page Container runtimes. They also point to the Official Docker Documentation.
# Install Docker CE
## Set up the repository:
### Install packages to allow apt to use a repository over HTTPS
sudo apt-get update && sudo apt-get install -y \
  apt-transport-https ca-certificates curl software-properties-common gnupg2

### Add Docker’s official GPG key
sudo curl -fsSL https://download.docker.com/linux/ubuntu/gpg | apt-key add -

### Add Docker apt repository.
sudo add-apt-repository \
  "deb [arch=amd64] https://download.docker.com/linux/ubuntu \
  $(lsb_release -cs) \
  stable"

## Install Docker CE.
sudo apt-get update && sudo apt-get install -y \
  containerd.io=1.2.13-1 \
  docker-ce=5:19.03.8~3-0~ubuntu-$(lsb_release -cs) \
  docker-ce-cli=5:19.03.8~3-0~ubuntu-$(lsb_release -cs)

# Setup daemon.
sudo cat > /etc/docker/daemon.json <<EOF
{
  "exec-opts": ["native.cgroupdriver=systemd"],
  "log-driver": "json-file",
  "log-opts": {
    "max-size": "100m"
  },
  "storage-driver": "overlay2"
}
EOF

sudo mkdir -p /etc/systemd/system/docker.service.d

# Restart docker.
sudo systemctl daemon-reload
sudo systemctl restart docker

# Verifyt that Docker Engine is installed correctly
sudo docker run hello-world
3.2 - Configure the Kubernetes repositories
Add kubernetes to the apt repository list and add the Google’s official pgp key
$ sudo sh -c "echo 'deb https://apt.kubernetes.io/ kubernetes-xenial main' >> /etc/apt/sources.list.d/kubernetes.list"

$ sudo sh -c "curl -s https://packages.cloud.google.com/apt/doc/apt-key.gpg | apt-key add -"

$ sudo apt-get update
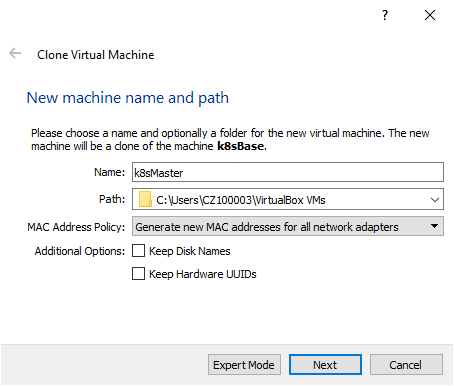
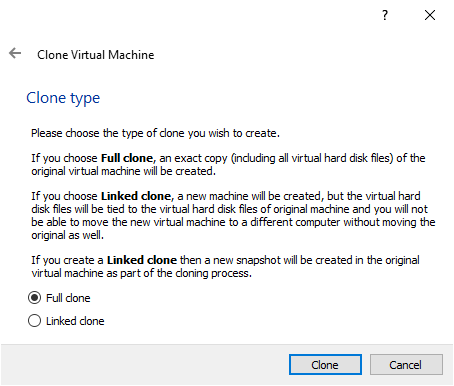
4 - Create your Kubernetes VM
Now that you have your base machine, you can close it to create your first kubernetes nodes. Name them “k8sMaster” and “k8sNode1” respectively.
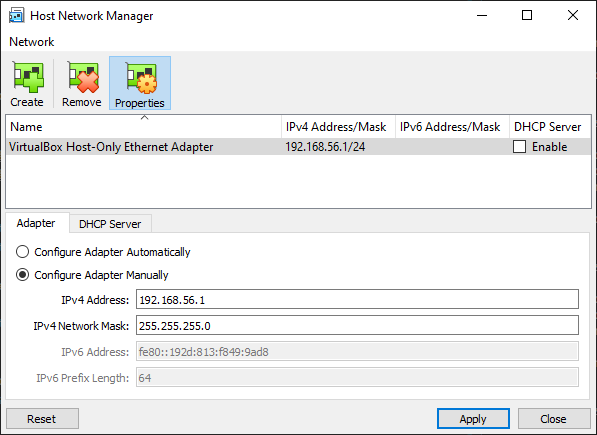
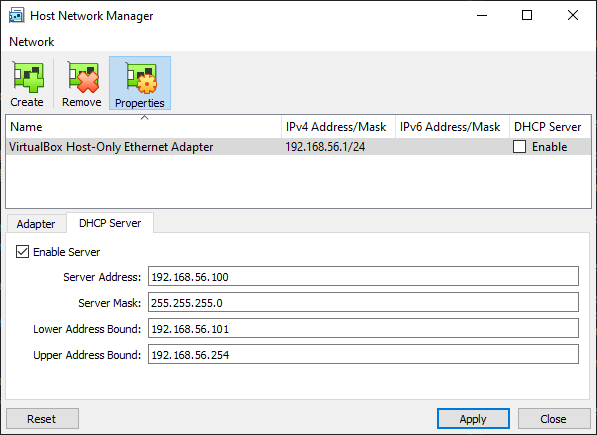
5 - Setting up the Network configuration
We are going to provide each of the kubernetes nodes with a static host-only ip address to use for kubernetes, in addition to the one provided by the NAT that they will use to reach the internet.
This way, they will be able to talk to each other and we can reach them from the host machine.
Check the ip addresses you are using in your environment, because you don’t want to overlap with your production environment.
If you don’t have one already (or if you want to use a dedicated one for your kubernetes cluster), got to Virtualbox > File > Host Network Manager > Create and create an adapter. Let all the default values and check the DHCP checker.
 )
)
 )
)
Now enable the Host-only Adapter for k8sMaster and k8sNode1.
 )
)
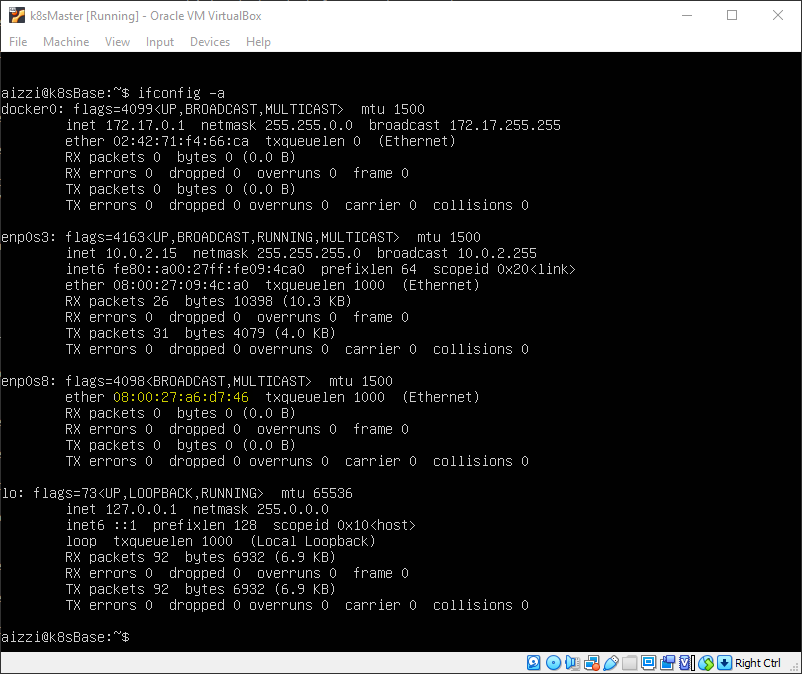
Now start k8sMaster and check the network interfaces with ifconfig -a. Identify the one attached to the Host Adapter. If you are in doubt, note that when you created the adapter it provided you with a MAC Address you can use for this task. In my configuration, the right one is called enp0s8.
 )
)
Let’s configure it with the static ip address 192.168.56.10 (check your configuration to know what address use in your configuration).
$ ls /etc/netplan
50-cloud-init.yaml

$ sudo vi /etc/netplan/50-cloud-init.yaml
Modify the content of the file as follows:
network:
    ethernets:
        enp0s3:
            dhcp4: true
        enp0s8:
            addresses:
                - 192.168.56.10/24
    version: 2
Then apply the configuration with sudo netplan apply. More examples about netplan are available here.
Do the same for k8sNode1 configuring the ipaddress 192.168.56.11.
Now, verify that:
- you can reach internet from both the VM:
ping 1.1.1.1-ping google.com - you can reach both VM from your host:
ping 192.168.56.10ping 192.168.56.11 - the two VM can ping each other
Now change the hostname of the two VM to reflect their role. On each VM run the following commands (using the appropriate hostname for each one):
$ sudo hostnamectl set-hostname k8sMaster
aizzi$ sudo reboot
6 - Generate keys to login from host
On the host, create a key-pair using ssh-keygen. It will be stored in id_rsa and id_rsa.pub.
Now ssh to k8sMaster:
$ sudo mkdir ~/.ssh
$ sudo chmod 700 ~/.ssh
$ sudo vi ~/.ssh/authorized_keys
    <paste the public key you copied in the clipboard and save the file. You can use the right mouse button to paste.>
$ sudo chmod 600 ~/.ssh/authorized_keys
$ sudo chown -R $(whoami):$(whoami) ~/.ssh/
Now you can login directly into the machines without providing the password: ssh aizzi@192.168.56.10.
Note : I’m not going to explore how to use multiple keys from one client to connect to different servers. If you need it, this article and this article and this article could be a good starting point.
7 - Installing kubernetes components on the Master
As detailed in the Before you begin section of the Kubernetes documentation, there are some pre-requisites for the virtual machine.
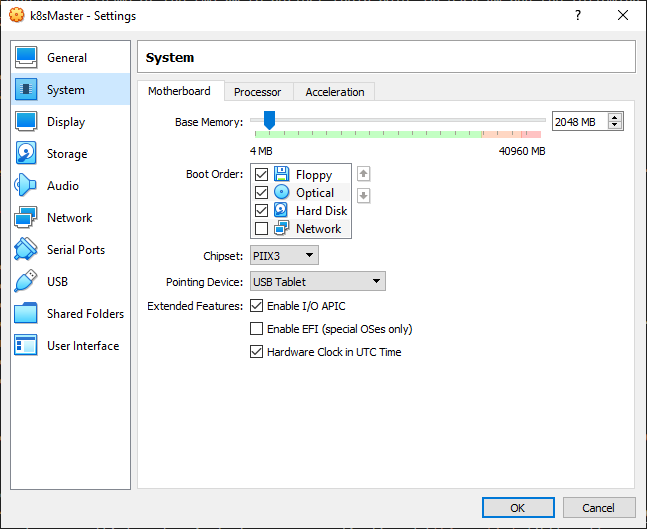
- Increase the VM RAM to 2GB (or more, as you need)
 )
)
Note This is mandatory on k8sMaster, optional on the nodes.
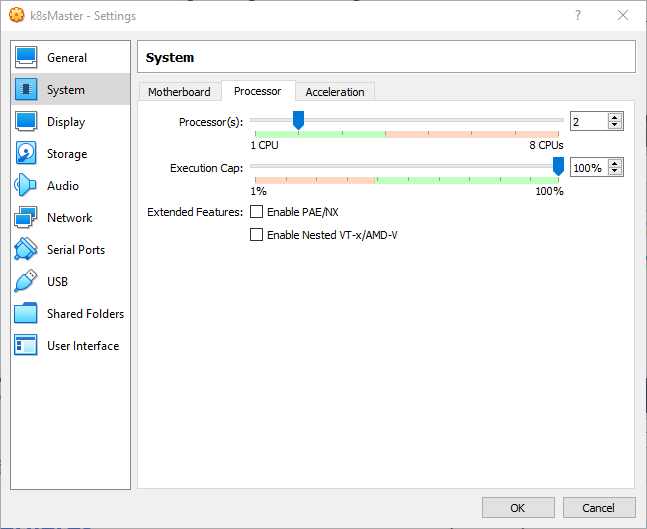
- Increase the number of processors to 2
 )
)
Note This is mandatory on k8sMaster, optional on the nodes.
- Verify the MAC address are unique for every node
We should have taken care of this aspect during the cloning of the VMs, but it is worth double-checking now.
aizzi@k8sMaster:~$ ifconfig enp0s8
enp0s8: flags=4163<UP,BROADCAST,RUNNING,MULTICAST>  mtu 1500
        inet 192.168.56.10  netmask 255.255.255.0  broadcast 192.168.56.255
        inet6 fe80::a00:27ff:fea6:d746  prefixlen 64  scopeid 0x20<link>
        ether 08:00:27:a6:d7:46  txqueuelen 1000  (Ethernet)
        RX packets 174  bytes 15925 (15.9 KB)
        RX errors 0  dropped 0  overruns 0  frame 0
        TX packets 119  bytes 15979 (15.9 KB)
        TX errors 0  dropped 0 overruns 0  carrier 0  collisions 0
aizzi@k8sNode1:~$ ifconfig enp0s8
enp0s8: flags=4163<UP,BROADCAST,RUNNING,MULTICAST>  mtu 1500
        inet 192.168.56.11  netmask 255.255.255.0  broadcast 192.168.56.255
        inet6 fe80::a00:27ff:fe0d:4f3  prefixlen 64  scopeid 0x20<link>
        ether 08:00:27:0d:04:f3  txqueuelen 1000  (Ethernet)
        RX packets 153  bytes 14281 (14.2 KB)
        RX errors 0  dropped 0  overruns 0  frame 0
        TX packets 118  bytes 15077 (15.0 KB)
        TX errors 0  dropped 0 overruns 0  carrier 0  collisions 0
- Verify that the product_uuid are unique for every node
aizzi@k8sMaster:~$ sudo cat /sys/class/dmi/id/product_uuid
[sudo] password for aizzi:
DBAAE751-1BBB-C24F-AB8D-234277D11CD4
aizzi@k8sNode1:~$ sudo cat /sys/class/dmi/id/product_uuid
[sudo] password for aizzi:
0D496210-45BA-B440-B807-1587CD80E83C
- Disable the
swap
On both VM execute
aizzi@k8sMaster:~$ sudo swapoff -a
Then edit the /etc/fstab file and comment out the swap line
#/swap.img none swap sw 0 0
- Letting iptables see bridged traffic
On both VM, make sure the br_netfilter module is loaded:
aizzi@k8sMaster:~$ lsmod | grep br_netfilter
br_netfilter           24576  0
bridge                155648  1 br_netfilter
If it is not running, you can load it explicitly by calling sudo modprobe br_netfilter.
Next, execute the following:
aizzi@k8sMaster:~$ cat <<EOF | sudo tee /etc/sysctl.d/k8s.conf
net.bridge.bridge-nf-call-ip6tables = 1
net.bridge.bridge-nf-call-iptables = 1
EOF
aizzi@k8sMaster:~$ sudo sysctl --system
- Install
kubeadm,kubeletandkubectl
kubeadm is the command to bootstrap the cluster.
kubelet is the component that runs all of the machines in your cluster and does things like starting pods and containers
kubectl is the command line util to talk to your cluster
Note : These components should be at the same version across your environment (although one minor version skew between the kubelet and the control plane is supported).
aizzi@k8sMaster:~$ sudo apt-get update && sudo apt-get install -y apt-transport-https curl
Hit:1 https://download.docker.com/linux/ubuntu bionic InRelease
Hit:2 http://cz.archive.ubuntu.com/ubuntu bionic InRelease
Get:3 http://cz.archive.ubuntu.com/ubuntu bionic-updates InRelease [88.7 kB]
Get:5 http://cz.archive.ubuntu.com/ubuntu bionic-backports InRelease [74.6 kB]
Get:6 http://cz.archive.ubuntu.com/ubuntu bionic-security InRelease [88.7 kB]
Hit:4 https://packages.cloud.google.com/apt kubernetes-xenial InRelease
Fetched 252 kB in 1s (385 kB/s)
Reading package lists... Done
Reading package lists... Done
Building dependency tree
Reading state information... Done
curl is already the newest version (7.58.0-2ubuntu3.8).
apt-transport-https is already the newest version (1.6.12).
0 upgraded, 0 newly installed, 0 to remove and 0 not upgraded.
aizzi@k8sMaster:~$ curl -s https://packages.cloud.google.com/apt/doc/apt-key.gpg | sudo apt-key add -
OK
aizzi@k8sMaster:~$ cat <<EOF | sudo tee /etc/apt/sources.list.d/kubernetes.list
> deb https://apt.kubernetes.io/ kubernetes-xenial main
> EOF
deb https://apt.kubernetes.io/ kubernetes-xenial main
aizzi@k8sMaster:~$ sudo apt-get update
Hit:1 https://download.docker.com/linux/ubuntu bionic InRelease
Hit:3 http://cz.archive.ubuntu.com/ubuntu bionic InRelease
Get:4 http://cz.archive.ubuntu.com/ubuntu bionic-updates InRelease [88.7 kB]
Hit:2 https://packages.cloud.google.com/apt kubernetes-xenial InRelease
Get:5 http://cz.archive.ubuntu.com/ubuntu bionic-backports InRelease [74.6 kB]
Get:6 http://cz.archive.ubuntu.com/ubuntu bionic-security InRelease [88.7 kB]
Fetched 252 kB in 1s (415 kB/s)
Reading package lists... Done
Install the components:
aizzi@k8sMaster:~$ sudo apt-get install -y kubelet kubeadm kubectl
Reading package lists... Done
Building dependency tree
Reading state information... Done
The following additional packages will be installed:
  conntrack cri-tools kubernetes-cni socat
The following NEW packages will be installed:
  conntrack cri-tools kubeadm kubectl kubelet kubernetes-cni socat
0 upgraded, 7 newly installed, 0 to remove and 0 not upgraded.
Need to get 52.1 MB of archives.
After this operation, 275 MB of additional disk space will be used.
Get:2 http://cz.archive.ubuntu.com/ubuntu bionic/main amd64 conntrack amd64 1:1.4.4+snapshot20161117-6ubuntu2 [30.6 kB]
Get:1 https://packages.cloud.google.com/apt kubernetes-xenial/main amd64 cri-tools amd64 1.13.0-00 [8776 kB]
Get:5 http://cz.archive.ubuntu.com/ubuntu bionic/main amd64 socat amd64 1.7.3.2-2ubuntu2 [342 kB]
Get:3 https://packages.cloud.google.com/apt kubernetes-xenial/main amd64 kubernetes-cni amd64 0.7.5-00 [6473 kB]
Get:4 https://packages.cloud.google.com/apt kubernetes-xenial/main amd64 kubelet amd64 1.18.2-00 [19.5 MB]
Get:6 https://packages.cloud.google.com/apt kubernetes-xenial/main amd64 kubectl amd64 1.18.2-00 [8825 kB]
Get:7 https://packages.cloud.google.com/apt kubernetes-xenial/main amd64 kubeadm amd64 1.18.2-00 [8162 kB]
Fetched 52.1 MB in 21s (2500 kB/s)
Selecting previously unselected package conntrack.
(Reading database ... 67333 files and directories currently installed.)
Preparing to unpack .../0-conntrack_1%3a1.4.4+snapshot20161117-6ubuntu2_amd64.deb ...
Unpacking conntrack (1:1.4.4+snapshot20161117-6ubuntu2) ...
Selecting previously unselected package cri-tools.
Preparing to unpack .../1-cri-tools_1.13.0-00_amd64.deb ...
Unpacking cri-tools (1.13.0-00) ...
Selecting previously unselected package kubernetes-cni.
Preparing to unpack .../2-kubernetes-cni_0.7.5-00_amd64.deb ...
Unpacking kubernetes-cni (0.7.5-00) ...
Selecting previously unselected package socat.
Preparing to unpack .../3-socat_1.7.3.2-2ubuntu2_amd64.deb ...
Unpacking socat (1.7.3.2-2ubuntu2) ...
Selecting previously unselected package kubelet.
Preparing to unpack .../4-kubelet_1.18.2-00_amd64.deb ...
Unpacking kubelet (1.18.2-00) ...
Selecting previously unselected package kubectl.
Preparing to unpack .../5-kubectl_1.18.2-00_amd64.deb ...
Unpacking kubectl (1.18.2-00) ...
Selecting previously unselected package kubeadm.
Preparing to unpack .../6-kubeadm_1.18.2-00_amd64.deb ...
Unpacking kubeadm (1.18.2-00) ...
Setting up conntrack (1:1.4.4+snapshot20161117-6ubuntu2) ...
Setting up kubernetes-cni (0.7.5-00) ...
Setting up cri-tools (1.13.0-00) ...
Setting up socat (1.7.3.2-2ubuntu2) ...
Setting up kubelet (1.18.2-00) ...
Created symlink /etc/systemd/system/multi-user.target.wants/kubelet.service → /lib/systemd/system/kubelet.service.
Setting up kubectl (1.18.2-00) ...
Setting up kubeadm (1.18.2-00) ...
Processing triggers for man-db (2.8.3-2ubuntu0.1) ...
Optionally, hold your kubernetes packages in order to not being updated:
aizzi@k8sMaster:~$ sudo apt-mark hold kubelet kubeadm kubectl
kubelet set on hold.
kubeadm set on hold.
kubectl set on hold.
Now, you can initialize your K8S Master with using the kubeadm init command:
aizzi@k8sMaster:~$ sudo kubeadm init --apiserver-advertise-address=192.168.56.10 --pod-network-cidr=192.168.0.0/16
Note : The
--pod-network-cidrvalue is the default CIDR used byCalico, a Pod network CIDR we’ll install in the next step. For Calico to work correctly, you need to pass this same CIDR tokubeadm init.
This command will take a while to run, but at the end you should see something like this:
Your Kubernetes control-plane has initialized successfully!

To start using your cluster, you need to run the following as a regular user:

  mkdir -p $HOME/.kube
  sudo cp -i /etc/kubernetes/admin.conf $HOME/.kube/config
  sudo chown $(id -u):$(id -g) $HOME/.kube/config

You should now deploy a pod network to the cluster.
Run "kubectl apply -f [podnetwork].yaml" with one of the options listed at:
  https://kubernetes.io/docs/concepts/cluster-administration/addons/

Then you can join any number of worker nodes by running the following on each as root:

kubeadm join 192.168.56.10:6443 --token lqrmgg.1o827uq2udy7mih2 \
    --discovery-token-ca-cert-hash sha256:30b8da498c9a0bc9e4458cc4c6ef93ddb9c9218ea8d37177214e35d35f054ef7
If you look at the command’s output, you’ll note that it contains several commands to run, as well as a kubadm join command with the token that you’ll need to join a new node to the cluste. Copy and keep this line for future reuse.
Note : The token is used for mutual authentication between the control-plane node and the joining nodes. The token included here is secret. Keep it safe, because anyone with this token can add authenticated nodes to your cluster. These tokens can be listed, created, and deleted with the
kubeadm tokencommand.
So, move on and run the suggested commands:
aizzi@k8sMaster:~$ mkdir -p $HOME/.kube

aizzi@k8sMaster:~$ sudo cp -i /etc/kubernetes/admin.conf $HOME/.kube/config

aizzi@k8sMaster:~$ sudo chown $(id -u):$(id -g) $HOME/.kube/config
8 - Installing a Pod network add-on
As detailed here, it is now time to deploy a Container Network Interface (CNI) based Pod network add-on so that your Pods can communicate with each other.
Currently, Calico is the only CNI plugin that the kubeadm project performs e2e test against, so this is what we are going to install here.
Install Calico by running the following command:
aizzi@k8sMaster:~$ kubectl apply -f https://docs.projectcalico.org/v3.11/manifests/calico.yaml
configmap/calico-config created
customresourcedefinition.apiextensions.k8s.io/felixconfigurations.crd.projectcalico.org created
customresourcedefinition.apiextensions.k8s.io/ipamblocks.crd.projectcalico.org created
customresourcedefinition.apiextensions.k8s.io/blockaffinities.crd.projectcalico.org created
customresourcedefinition.apiextensions.k8s.io/ipamhandles.crd.projectcalico.org created
customresourcedefinition.apiextensions.k8s.io/ipamconfigs.crd.projectcalico.org created
customresourcedefinition.apiextensions.k8s.io/bgppeers.crd.projectcalico.org created
customresourcedefinition.apiextensions.k8s.io/bgpconfigurations.crd.projectcalico.org created
customresourcedefinition.apiextensions.k8s.io/ippools.crd.projectcalico.org created
customresourcedefinition.apiextensions.k8s.io/hostendpoints.crd.projectcalico.org created
customresourcedefinition.apiextensions.k8s.io/clusterinformations.crd.projectcalico.org created
customresourcedefinition.apiextensions.k8s.io/globalnetworkpolicies.crd.projectcalico.org created
customresourcedefinition.apiextensions.k8s.io/globalnetworksets.crd.projectcalico.org created
customresourcedefinition.apiextensions.k8s.io/networkpolicies.crd.projectcalico.org created
customresourcedefinition.apiextensions.k8s.io/networksets.crd.projectcalico.org created
clusterrole.rbac.authorization.k8s.io/calico-kube-controllers created
clusterrolebinding.rbac.authorization.k8s.io/calico-kube-controllers created
clusterrole.rbac.authorization.k8s.io/calico-node created
clusterrolebinding.rbac.authorization.k8s.io/calico-node created
daemonset.apps/calico-node created
serviceaccount/calico-node created
deployment.apps/calico-kube-controllers created
serviceaccount/calico-kube-controllers created
9 - Enable the Master to host pods
By default, your cluster will not schedule Pods on the control-plane node for security reasons. If this is good for productions environment, running a local test environment this is a waste of precious resources.
If you wish, you can enable the master node to run pods with the following command:
aizzi@k8sMaster:~$ kubectl taint nodes --all node-role.kubernetes.io/master-
node/k8smaster untainted
And with this, you’re ready to add nodes to your cluster.
10 - Adding a Node
Move to k8sNode1 and install kubernetes:
aizzi@k8sNode1:~$ sudo apt-get update && sudo apt-get install -y apt-transport-https curl

aizzi@k8sNode1:~$ curl -s https://packages.cloud.google.com/apt/doc/apt-key.gpg | sudo apt-key add -

aizzi@k8sNode1:~$ cat <<EOF | sudo tee /etc/apt/sources.list.d/kubernetes.list
> deb https://apt.kubernetes.io/ kubernetes-xenial main
> EOF

aizzi@k8sNode1:~$ sudo apt-get update

aizzi@k8sMaster:~$ sudo apt-get install -y kubelet kubeadm kubectl
Optionally, hold your kubernetes packages in order to not being updated:
aizzi@k8sMaster:~$ sudo apt-mark hold kubelet kubeadm kubectl
Now, copy and paste the kubeadm join command from the Master:
aizzi@k8sNode1:~$ sudo kubeadm join 192.168.56.10:6443 --token lqrmgg.1o827uq2udy7mih2 --discovery-token-ca-cert-hash sha256:30b8da498c9a0bc9e4458cc4c6ef93dd
b9c9218ea8d37177214e35d35f054ef7
W0511 12:23:19.625828    4446 join.go:346] [preflight] WARNING: JoinControlPane.controlPlane settings will be ignored when control-plane flag is not set.
[preflight] Running pre-flight checks
[preflight] Reading configuration from the cluster...
[preflight] FYI: You can look at this config file with 'kubectl -n kube-system get cm kubeadm-config -oyaml'
[kubelet-start] Downloading configuration for the kubelet from the "kubelet-config-1.18" ConfigMap in the kube-system namespace
[kubelet-start] Writing kubelet configuration to file "/var/lib/kubelet/config.yaml"
[kubelet-start] Writing kubelet environment file with flags to file "/var/lib/kubelet/kubeadm-flags.env"
[kubelet-start] Starting the kubelet
[kubelet-start] Waiting for the kubelet to perform the TLS Bootstrap...

This node has joined the cluster:
* Certificate signing request was sent to apiserver and a response was received.
* The Kubelet was informed of the new secure connection details.

Run 'kubectl get nodes' on the control-plane to see this node join the cluster.
Wait a little bit and check that the Node is visible from the Master:
aizzi@k8sMaster:~$ kubectl get nodes
NAME        STATUS   ROLES    AGE    VERSION
k8smaster   Ready    master   123m   v1.18.2
k8snode1    Ready    <none>   116s   v1.18.2
11 - Adding a Node after 24 hours
The token generated on the server expires after 24 hours. If you want to add a new Node after that period, a new token must be generated.
See if a token exist with kubeadm token list. If not, generate a new one with kubeadm token create --print-join-command
12 - Setting up the correct IP Addresses for the nodes
The worker internal IP address is the wrong one:
aizzi@k8sMaster:~$ kubectl get nodes -o wide
NAME        STATUS     ROLES    AGE   VERSION   INTERNAL-IP   EXTERNAL-IP   OS-IMAGE             KERNEL-VERSION       CONTAINER-RUNTIME
k8smaster   Ready      master   10d   v1.18.3   10.0.2.15     <none>        Ubuntu 18.04.4 LTS   4.15.0-101-generic   docker://19.3.11
k8snode1    NotReady   <none>   7s    v1.18.3   10.0.2.15     <none>        Ubuntu 18.04.4 LTS   4.15.0-101-generic   docker://19.3.11
This is the NAT address of the VM, which is automatically provided by VirtualBox. It is the interface used to access the internet, but it is not the one we want for our nodes.
In order to correct it, edit the file /etc/default/kubelet and add the following line:
KUBELET_EXTRA_ARGS=--node-ip=<ip you want the node on>
Then restart the kubelet:
aizzi@k8sNode1:~$ sudo systemctl daemon-reload
aizzi@k8sNode1:~$ sudo systemctl restart kubelet
Now we have the right address:
aizzi@k8sMaster:~$ kubectl get nodes -o wide
NAME        STATUS   ROLES    AGE     VERSION   INTERNAL-IP     EXTERNAL-IP   OS-IMAGE             KERNEL-VERSION       CONTAINER-RUNTIME
k8smaster   Ready    master   10d     v1.18.3   10.0.2.15       <none>        Ubuntu 18.04.4 LTS   4.15.0-101-generic   docker://19.3.11
k8snode1    Ready    <none>   3m32s   v1.18.3   192.168.56.11   <none>        Ubuntu 18.04.4 LTS   4.15.0-101-generic   docker://19.3.11
Do the same on the master too.
aizzi@k8sMaster:~$ kubectl get nodes -o wide
NAME        STATUS   ROLES    AGE     VERSION   INTERNAL-IP     EXTERNAL-IP   OS-IMAGE             KERNEL-VERSION       CONTAINER-RUNTIME
k8smaster   Ready    master   10d     v1.18.3   192.168.56.10   <none>        Ubuntu 18.04.4 LTS   4.15.0-101-generic   docker://19.3.11
k8snode1    Ready    <none>   8m29s   v1.18.3   192.168.56.11   <none>        Ubuntu 18.04.4 LTS   4.15.0-101-generic   docker://19.3.11
13 - Conclusions
You now have a 2-node kubernetes cluster to play with.
Of course, this is only the starting point: there is a lot more to explore before to use Kubernetes.
A good place to start could be the Tutorials page on Kubernetes website.
Learn smart, code hard, have fun!