How to create a basic chat interface with Kivy
Last Updated: Monday, January 06, 2020
- Assumptions
- Why Kivy
- The Requirements
- The Desktop Interface
- Echoing The User Input
- Keeping The Chat History
- Align To The Left
- Scrolling
- Questions and Answers
- Talking With A Server
- Exchanging Messages
- Complete Files
- Conclusion
Assumptions
This tutorial assume the following knowledge on your side:
- Python 3.8 is installed and working in your system
- Kivy framework installed and working. If you need help to install it, this is the download page with related instructions.
Be aware that at the moment of writing, the current version of Kivy is 1.11.0. However, since it does not support Python 3.8, I used the version 2.0rc1 using the following commands:
pip install kivy[base] --pre --extra-index-url https://kivy.org/downloads/simple
pip install kivy_examples --pre --extra-index-url https://kivy.org/downloads/simple
Why Kivy
Although nowadays web interfaces are the last trend, there are times when a good old desktop interface is still the better choice for several reasons.
I’m working on a side project where I found those reasons to be valid, so I searched for a suitable desktop framework in Python and found Kivy. It is cross platform and (apparently) well supported, so I decided to give it a try and started experimenting.
My first need was to create a simple chat interface, and I wasn’t able to find any tutorial for such a task. So I decided to write one out of my experiments.
This is what this tutorial is about. Please, consider that I know practically nothing about Kivy at the moment. It’s been only a couple of day I’m playing with it. I’m sure that things can be done better, but done is better than good.
The Requirements
This is the use case I want to answer to
- The User insert a message (
user_question) into the Desktop console - The
user_questionis echoed into thechat_consoleon the Desktop - The
user_questionis sent to thechat_server - The
chat_serverevaluate aserver_answer - The
server_answeris sent back to thechat_console - The
chat_consoleechoes theserver_answerfor the User to read
The Desktop Interface
The first step of this tutorial is to create the desktop interface for the User to input the user_question.
Create two files to hold your code:
console.pyfor the logicconsole.kvfor the view layout
Edit the console.py and create the skeleton of your application:
#console.py

from kivy.app import App
from kivy.uix.boxlayout import BoxLayout
from kivy.properties import ObjectProperty


class ConsoleController(BoxLayout):
    """
    Define the main Controller window of the application. This is a BoxLayout that arranges children in a vertical way.
    """

    pass


class ConsoleApp(App):
    """
    The Console Application
    """

    def build(self):
        self.title = "Chat Console"
        return ConsoleController()


if __name__ == "__main__":
    ConsoleApp().run()
Nothing fancy here. We define a class ConsoleApp based on the Kivy App class. It creates the main window for the application and will add to it the ConsoleController widget as the root widget.
The ConsoleController is based on the BoxLayout widget. This is basically a container for other widgets, that can be arranged either vertically or horizontally. We’ll arrange them vertically: the chat window on top, the input control at the bottom.
The layout of the ConsoleController is described into the console.kv file:
#:kivy 2.0

<ConsoleController>:
    orientation: 'vertical'
Go on and execute console.py. If everything is fine, you should see the following window.
It does not contain anything yet, so let’s define the chat_widget and the input_widget. Move to console.kv and modify <ConsoleController> in the following way:
<ConsoleController>:
    orientation: 'vertical'
    Label:
        id: chat_widget_id
        text: "Welcome to the Chat Widget"
        size_hint: (1,1)
    TextInput:
        id: input_widget_id
        multiline: False
        size_hint: (1, None)
        hint_text: "Your message here"
        height: self.minimum_height
The Label section define our chat widget, where we will store our conversation’s text. id assigns an identifier to it, so that we can refer to it from other widgets. text define its content. size_hint is a responsive statement to assign the widget all available space in the window (everything except the TextInput define below).
The TextInput section define the input_widget for user’s input. size_hint(1, None) means it will use all the horizontal space, but will not follow on the vertical dimension. This is defined by the height properties to be exactly the minimum needed to contain the text.
Now, you should see the following when you execute your console.
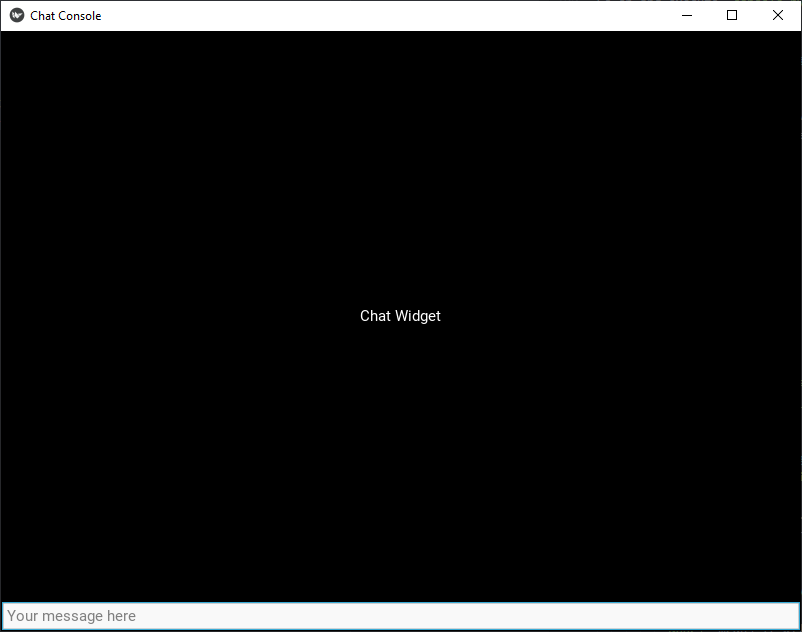
and you should be able to insert your text in the TextInput field.
Echoing The User Input
The next step is to echo the user’s input into the chat_widget. To do so, modify the TextInput section in the console.kv by adding the following line to it:
on_text_validate: root.chat_input_callback(self.text)
on_text_validate is an event that is generated when we hit ENTER into the TextInput widget. We are binding it to the function chat_input_callback in the ConsoleController widget. This function will receive the input text (self.text), will modify the chat_widget text to show it and will clear the .
To do so, we need a way to access the widget’s instances defined in the kv file from the python code. We do this with ObjectProperties. Add the following two lines into the console.kv file, right before the orientation property of the ConsoleController:
chat_widget: chat_widget_id
input_widget: input_widget_id
This way we define two objects that we can reference from the associated Python code, and point them to the objects identified by the related id.
Now, modify the ConsoleController class in console.py in the following way:
class ConsoleController(BoxLayout):
    """
    Define the main Controller window of the application. This is a BoxLayout that arranges children in a vertical way.
    """

    chat_widget = ObjectProperty(None)
    input_widget = ObjectProperty(None)

    def AddMessageToChatHistory(self, message):
        self.chat_widget.text = message

    def chat_input_callback(self, message):
        self.AddMessageToChatHistory(message)
        self.input_widget.text = ""
        return False
The code above is pretty straightforward to read.
chat_widget = ObjectProperty(None)
input_widget = ObjectProperty(None)
creates two objects we can reference into the class. Kivy will associate them to the right object’s instances in the view.
def chat_input_callback(self, message):
    self.AddMessageToChatHistory(message)
    self.input_widget.text = ""
    return False
This function receives the message from the event handler we defined in the console.kv file, pass it to the AddMessageToChatHistory to modify the chat history, clear the input text and stop the propagation of the event (return False).
def AddMessageToChatHistory(self, message):
    self.chat_widget.text = message
This function replace the chat_widget text with the user’s input.
Now execute console.py, enter some text in the input field and press enter. If everything is fine, your chat window should change to show your message.

Keeping The Chat History
The next step is to build the chat history. Let’s start by adding a white background to the chat window. Unfortunately, the Label class cannot set a foreground, so we need a workaround here.
Modify the console.kv by adding the following classes before the ConsoleController section:
<BackgroundColor@Widget>:
    background_color: 1,1,1,1
    canvas.before:
        Color:
            rgba: root.background_color
        Rectangle:
            size: self.size
            pos: self.pos

<BackgroundLabel@Label+BackgroundColor>:
    background_color: 0,0,0,0
BackgroundColor defines a class that inherit from Widget, which has a background color property to set.
BackgroundLabel inherits from both Label and BackgroundColor classes. So, it is basically a label with a background color. Now, let’s modify ConsoleController to use BackgroundLabel instead of label and we have a chat window with a white background.
Now, add the following properties
color: 0,0,0,1 # to set black text
and voilà, we have a chat window with white background and black text.
Now, let’s modify the AddMessageToChatHistory to keep the message’s History
def AddMessageToChatHistory(self, message):
    chat_text = self.chat_widget.text
    chat_text = chat_text + "\n\n" + message
    self.chat_widget.text = chat_text
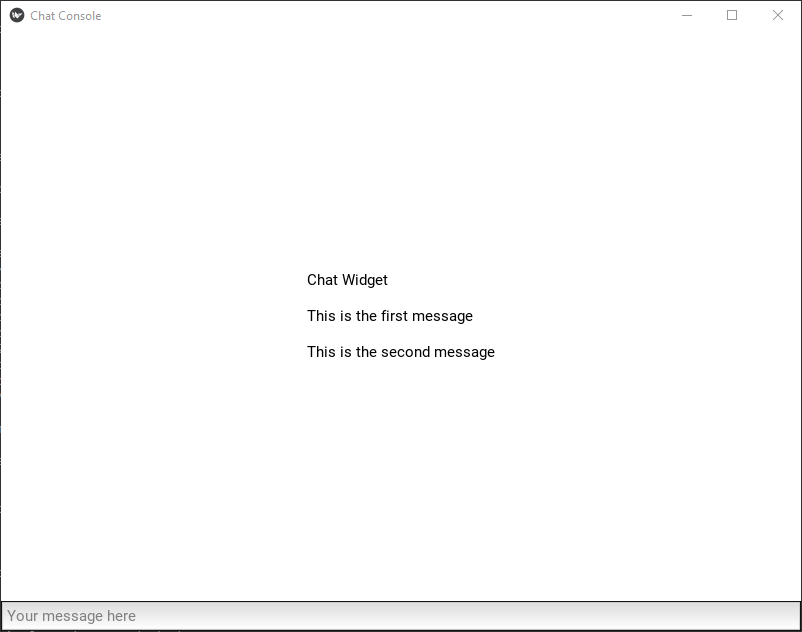
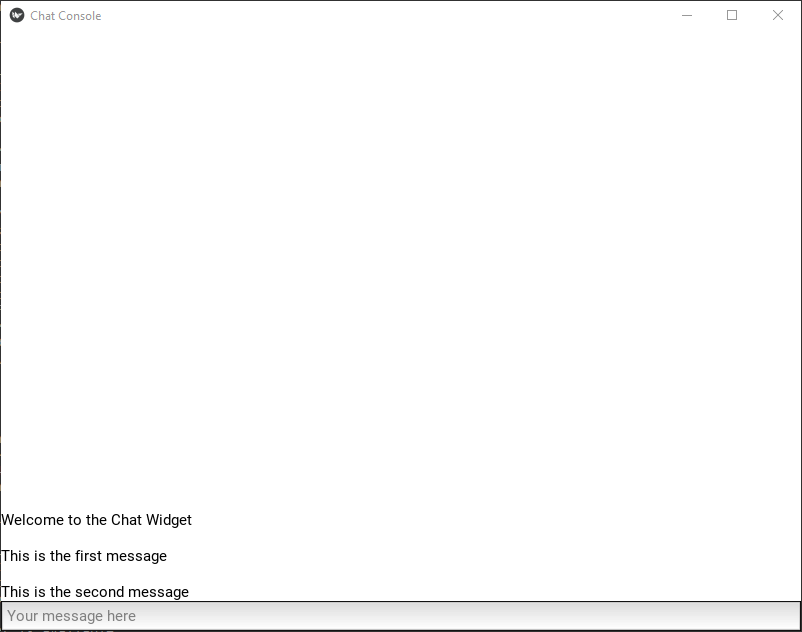
Go on and execute your new console. Insert a couple of message and check the result:
Align To The Left
The next steps will be to align the text to the left.
To do so, modify the BackgroundLabel by adding the following properties:
text_size: self.size
halign: 'left'
Restart your application, insert a couple of messages and check that everything is working fine.
Scrolling
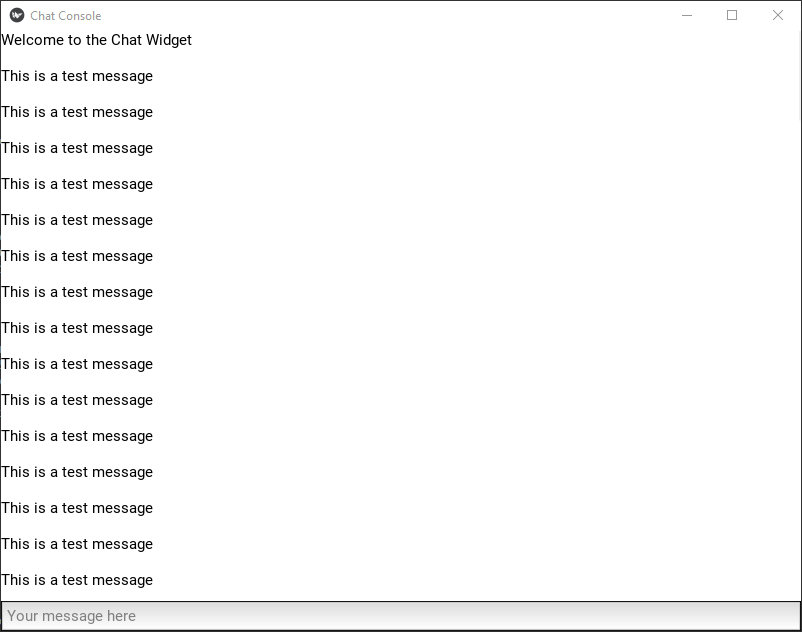
Now, if you keep adding messages, you will notice that your messages will scroll up and eventually disappear. We want the window to be scrollable in order to actually check our history.
To better work this out, let’s modify our AddMessageToChatHistory so that it will echo the message 100 times:
def AddMessageToChatHistory(self, message):
    chat_text = self.chat_widget.text
    for i in range(100):
        chat_text = chat_text + "\n\n" + str(i) + " - " + message
    self.chat_widget.text = chat_text
Now, let’s include our chat window into a ScrollView. Change the BackgroundLabel section in console.kv to look like this:
ScrollView:
    id: scroll_view_id
    do_scroll_y: True
    do_scroll_x: False
    size_hint: (1,None)
    height: Window.height
    BackgroundLabel:
        id: chat_widget_id
        text: "Welcome to the Chat Widget"
        color: 0,0,0,1
        size_hint: (1,None)
        text_size: (self.width, None)
        height: max(scroll_view_id.height, self.texture_size[1])
        halign: 'left'
This proved to be quite complex to accomplish, so let’s review it line by line.
ScrollView
instantiate an instance of ScrollView Class
id: scroll_view_id
assigns it a name to reference it later
do_scroll_y: True
do_scroll_x: False
tells it to scroll only vertically
size_hint: (1, None)
tells it to adjust horizontally but not vertically.
scroll_y: 0
tells it to always scroll to the bottom. This way we will always see the last message added.
height: Window.height - input_widget.height
bind its height to the window’s height. The Window class is imported via the directive
#:import Window kivy.core.window.Window
As per the BackgroundLabel, it is now contained into the ScrollView and modified to
size_hint: (1, None)
adjust horizontally but not vertically.
text_size: (self.width, None)
bound the text horizontally but not vertically. In other words, the text will wrap at the end of the line, but has no vertical limit.
height: max(scroll_view_id.height, self.texture_size[1])
bounds the height of the text to the height of the scroll window or the vertical size of the text into the widget, whatever is greater.
This way, the text into the chat_widget can grow vertically as it’s needed and the ScrollView will always show us a specific portion of it, the size of the window, that we can move as we like.
Now, go on and execute the app. Insert a test message. This will be echoed 100 times and you should be able to scroll through the history.
Remember to change the AddMessageToChatHistory method back to its original form:
def AddMessageToChatHistory(self, message):
    chat_text = self.chat_widget.text
    chat_text = chat_text + "\n\n" + message
    self.chat_widget.text = chat_text
Questions and Answers
Up to now, our chat does very little. Now it’s time to add a way to send our messages and receive back answers.
Let’s start very simply by adding the following method to our ConsoleController class:
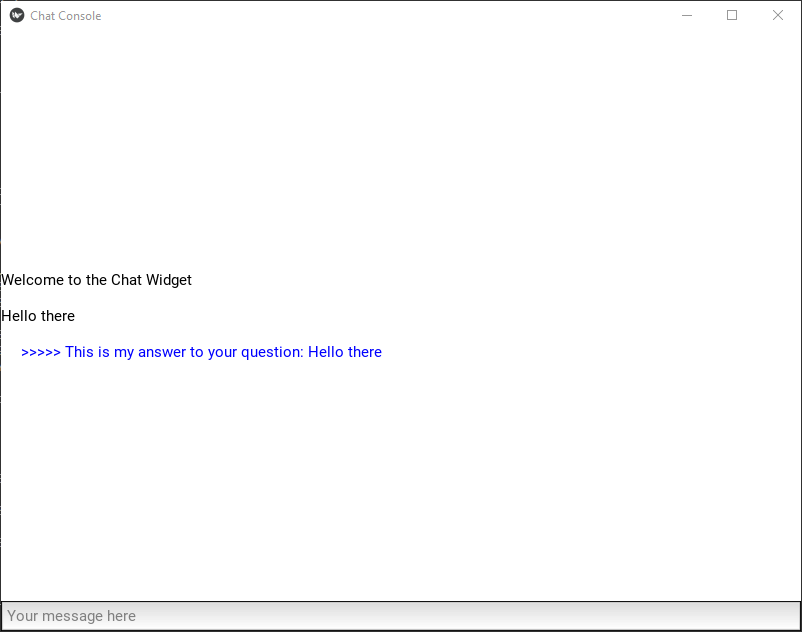
def send_question(self, question):
    answer = "This is my answer to your question: " + question
    self.AddMessageToChatHistory(answer, type="answer")
    return answer
It basically receives a question, prepend it with “This is my answer to your question: “ and provide it back to the user. We still don’t have the “send and receive” channel, so we’ll simulate it by inserting the answer in the chat flow as a type="answer" message.
We want a way to visually identify questions and answers, so let’s say that answers will be in blue text indented and modify the AddMessageToChatHistory method accordingly.
def AddMessageToChatHistory(self, message, type="question"):
    if type is "question":
        text_col = "#000000"
        text_prompt = ""
    else:
        text_col ="#0000FF"
        text_prompt = "     >>>>> "
    chat_text = self.chat_widget.text
    chat_text = f"{chat_text}\n\n[color={text_col}]{text_prompt}{message}[/color]"
    self.chat_widget.text = chat_text
In order for the [color] markup to work, we must add the following property to our BackgroundLabel in console.kv:
markup: True
Now, let’s modify the chat_input_callback to send the question and we should have our conversation done.
def chat_input_callback(self, message):
    self.AddMessageToChatHistory(message)
    self.send_question(message)
    self.input_widget.text = ""
    return False
Talking With A Server
We’ve come a long way since we started. We are now able to send a message and receive and answer, but all is inside the same application. It could be useful, but what we really want is to be able to communicate with a remote server.
Let’s try and implement such a server using python-socketio.
First of all, create a server to handle events from the console. In a server.py file add the following:
import eventlet
import socketio

sio = socketio.Server()
app = socketio.WSGIApp(sio)


@sio.event
def connect(sid, environ):
    print("Connection received from client: ", sid)


@sio.event
def disconnect(sid):
    print(" Client disconnecting")


if __name__ == "__main__":
    eventlet.wsgi.server(eventlet.listen(("127.0.0.1", 8000)), app)
Now, modify the console.py to use socket client-server communications.
import socketio

[...]

class ConsoleApp(App):
    """
    The Console Application
    """

    def build(self):
        self.title = "Chat Console"
        return ConsoleController()

    def on_start(self):
        Logger.info("Application: Application starting")
        self.sio = socketio.Client(logger=Logger)
        self.sio.connect("http://127.0.0.1:8000")

    def on_stop(self):
        Logger.info("Application: Application stopping")
        self.sio.disconnect()
Here, we have added two methods to the ConsoleApp class.
on_start creates a socket channel when the application starts, and connect it to the server.
on_stop disconnect from the server when we close the application.
Now, in a console window start the server.py. You should see something like:
(276) wsgi starting up on http://127.0.0.1:8000
In another console, start the application. You should get something in the logs like:
[INFO   ] [Application ] Application starting
[INFO   ] Engine.IO connection established
[INFO   ] Namespace / is connected
[INFO   ] [Base        ] Start application main loop
and in the server window now you should have
(276) accepted ('127.0.0.1', 59045)
Connection received from client:  2ddbe965b08d4a19ac7b80f89c796b06
127.0.0.1 - - [06/Jan/2020 01:39:07] "GET /socket.io/?transport=polling&EIO=3&t=1578271147.2916405 HTTP/1.1" 200 349 0.001000
(276) accepted ('127.0.0.1', 59046)
Note the line Connection received from client.... This is printed by our server in response to a connection event.
Wonderful! Our desktop console is talking to a remote server.
Exchanging Messages
So, the next step is to let the server handle the user input and provide an answer.
We are going to modify our console.py so that in response to a user input, it will update the chat_widget and send an event to the server. The server will process the event, produce the answer and send an event to the console. The console will then update the chat_widget with the server’s answer.
Let’s go.
First of all, since we have defined our socket in the ConsoleApp class, let’s move the chat_input_callback in this class.
class ConsoleApp(App):
    """
    The Console Application
    """

    def build(self):
        self.title = "Chat Console"
        self.controller = ConsoleController()
        return self.controller

    def on_start(self):
        Logger.info("Application: Application starting")
        self.sio = socketio.Client(logger=Logger)
        self.sio.connect("http://127.0.0.1:8000")
        self.sio.on("server_answer", self.server_answer)

    def on_stop(self):
        Logger.info("Application: Application stopping")
        self.sio.disconnect()

    def chat_input_callback(self, message):
        Logger.info(f"Application: Received user input: {message}")
        self.controller.AddMessageToChatHistory(message)
        self.controller.input_widget.text = ""
        self.sio.emit("chat_user_input", message)
        return False

    def server_answer(self, message):
        Logger.info(f"Application: Received answer from server: {message}")
        self.controller.AddMessageToChatHistory(message, type="answer")
The chat_input_callback method is the same as before, except that it emits a chat_user_input event for the server.
The server_answer method is the handler for the server’s event. The handler is binded to the event in the on_start method by the self.sio.on() statement.
In console.kv change the binding for on_text_validate event to point to the new callback:
on_text_validate: app.chat_input_callback(self.text)
In server.py create the chat_user_input handler:
@sio.event
def chat_user_input(sid, message):
    print(f"Received user input: {message}")
    payload = "This is my answer to your question: " + message
    sio.emit("server_answer", payload, room=sid)
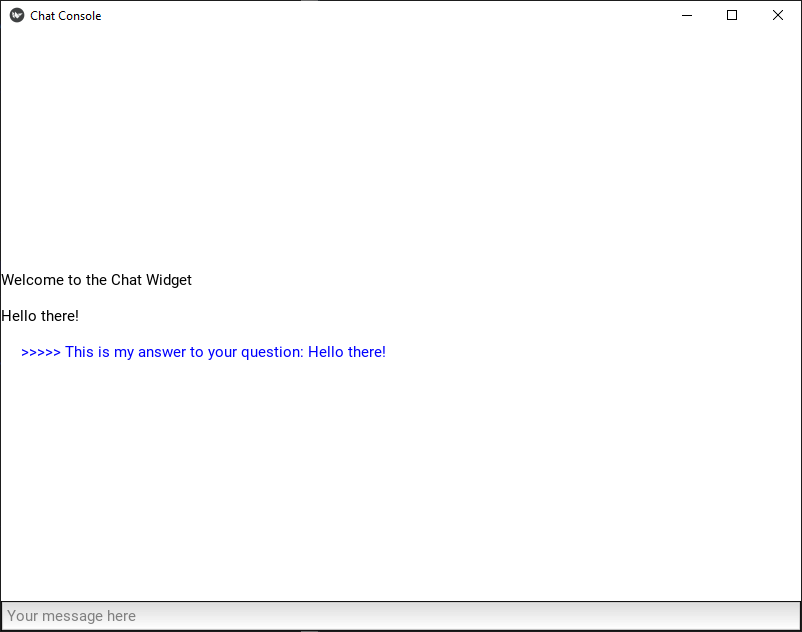
That’s it. Start the console and type your input. On the client log you should see:
[INFO   ] [Application ] Application starting
[INFO   ] Engine.IO connection established
[INFO   ] Namespace / is connected
[INFO   ] [Base        ] Start application main loop
[INFO   ] [Application ] Received user input: Hello there!
[INFO   ] Emitting event "chat_user_input" [/]
[INFO   ] Received event "server_answer" [/]
[INFO   ] [Application ] Received answer from server: This is my answer to your question: Hello there!
while on the server the corresponding flow is:
(1636) wsgi starting up on http://127.0.0.1:8000
(1636) accepted ('127.0.0.1', 59384)
Connection received from client:  522ca95dd5da4aa3bcdd551517a37d44
127.0.0.1 - - [06/Jan/2020 02:24:54] "GET /socket.io/?transport=polling&EIO=3&t=1578273894.2962816 HTTP/1.1" 200 349 0.000996
(1636) accepted ('127.0.0.1', 59385)
Received user input: Hello there!
Complete Files
This is the final version of the files used.
console.py
from kivy.app import App
from kivy.uix.boxlayout import BoxLayout
from kivy.properties import ObjectProperty
from kivy.logger import Logger
import socketio


class ConsoleController(BoxLayout):
    """
    Define the main Controller window of the application. This is a BoxLayout that arranges children in a vertical way.
    """

    chat_widget = ObjectProperty(None)
    input_widget = ObjectProperty(None)

    def __init__(self, **kwargs):
        super(ConsoleController, self).__init__(**kwargs)

    def AddMessageToChatHistory(self, message, type="question"):
        if type == "question":
            text_col = "#000000"
            text_prompt = ""
        else:
            text_col = "#0000FF"
            text_prompt = "     >>>>> "
        chat_text = self.chat_widget.text
        chat_text = f"{chat_text}\n\n[color={text_col}]{text_prompt}{message}[/color]"
        self.chat_widget.text = chat_text


class ConsoleApp(App):
    """
    The Console Application
    """

    def build(self):
        self.title = "Chat Console"
        self.controller = ConsoleController()
        return self.controller

    def on_start(self):
        Logger.info("Application: Application starting")
        self.sio = socketio.Client(logger=Logger)
        self.sio.connect("http://127.0.0.1:8000")
        self.sio.on("server_answer", self.server_answer)

    def on_stop(self):
        Logger.info("Application: Application stopping")
        self.sio.disconnect()

    def chat_input_callback(self, message):
        Logger.info(f"Application: Received user input: {message}")
        self.controller.AddMessageToChatHistory(message)
        self.controller.input_widget.text = ""
        self.sio.emit("chat_user_input", message)
        return False

    def server_answer(self, message):
        Logger.info(f"Application: Received answer from server: {message}")
        self.controller.AddMessageToChatHistory(message, type="answer")


if __name__ == "__main__":
    ConsoleApp().run()
console.kv
#:kivy 2.0
#:import Window kivy.core.window.Window

<BackgroundColor@Widget>:
    background_color: 1,1,1,1
    canvas.before:
        Color:
            rgba: root.background_color
        Rectangle:
            size: self.size
            pos: self.pos

<BackgroundLabel@Label+BackgroundColor>:
    background_color: 1,1,1,1

<ConsoleController>:
    chat_widget: chat_widget_id
    input_widget: input_widget_id
    orientation: 'vertical'
    ScrollView:
        id: scroll_view_id
        do_scroll_y: True
        do_scroll_x: False
        size_hint: (1,None)
        height: Window.height - input_widget_id.height
        scroll_y: 0
        BackgroundLabel:
            id: chat_widget_id
            text: "Welcome to the Chat Widget"
            color: 0,0,0,1
            size_hint: (1,None)
            text_size: (self.width, None)
            height: max(scroll_view_id.height, self.texture_size[1])
            halign: 'left'
            markup: True
    TextInput:
        id: input_widget_id
        multiline: False
        size_hint: (1, None)
        hint_text: "Your message here"
        height: self.minimum_height
        on_text_validate: app.chat_input_callback(self.text)
server.py
import eventlet
import socketio

sio = socketio.Server()
app = socketio.WSGIApp(sio)


@sio.event
def connect(sid, environ):
    print("Connection received from client: ", sid)


@sio.event
def disconnect(sid):
    print(" Client disconnecting")


@sio.event
def chat_user_input(sid, message):
    print(f"Received user input: {message}")
    payload = "This is my answer to your question: " + message
    sio.emit("server_answer", payload, room=sid)


if __name__ == "__main__":
    eventlet.wsgi.server(eventlet.listen(("127.0.0.1", 8000)), app)
Conclusion
This is of course a very basic tutorial. The Socket’s world is more complex than this and a lot is missing here, but this is just the first step: I started playing with Socket.io and Kivy just a couple of days ago.
I hope you’d find this tutorial instructive. It certainly was for me. What I recorded in this article is my flow of thoughts, issues and resolutions. Feel free to reuse the above instructions in your own project.
Learn smart, code hard, have fun!